Tikka T3/T3x – striker spring kit


Product description
This Tikka T3/T3x striker spring kit can help you solve ignition issues or get faster lock times. Also usefull as a spare set in case trouble might come. Made from high quality corrosion resistant materials.
€26.20 exclusive VAT.
3 in stock

3 in stock
Often combined with:

Description
Tikka T3/T3X striker spring kit / Firing pin kit
The Tikka T3/T3x striker spring kit can help you solve ignition issues. This can be lite light primer strikes or even worse complete failure to fire cartridges. So when already tried different brands of factory ammunition or tried reloading with different primers, this kit might be your solution.
The Tikka T3/T3x striker spring kit is manufactured from high quality spring wire then zinc plated to resist corrosion. Our striker spring for your Tikka T3 / T3x is longer than the OEM spring and is manufactured from high quality piano wire then zinc plated (silver color) to resist corrosion.
When stripping the bolt assembly for cleaning and maintenance, the striker pin is often overlooked. Our kit allows you to refurbish these critical components after a thorough cleaning rather than reinstall worn or damaged components. Keeping a spare set on hand (and the tools to change them) also serves as cheap insurance for any upcoming expeditions.
Primer ignition issues relating to spring pressure
We also include at no extra cost a higher power spring (gold color) made from thicker diameter wire which is approximately 10% stronger (if installed at full length). Primer ignition issues can be caused by insufficient spring pressure. This higher power spring can be used to try to solve this primer ignition issues. It might also lead to faster lock times. However in many cases it will require between 1 to 4 coils to cut off to function as desired in your rifle (see also section ‘reassambly’ down below). It must be noted that most target shooters use the included ‘silver’ spring.
Included
- 1 x striker spring (standard, silver color)
- 1 x striker spring (+10% power, gold color)
- 1 x retaining collet
- 3 x 5mm snap rings
Construction
- The striker springs are made from a high quality spring steel then zinc plated
- The snap rings are made from stainless steel spring wire
- The retaining collet is CNC machined from pre-hardened 17-4 grade stainless steel then TiN coated to the gold color (the original Tikka part is made from an aluminum alloy)
Recommended Tools for Workshop Installation
- Engineers offset vise (to be modified as below, requires a hand drill and various HSS bits)
- Small nylon-jawed pliers (we use bracelet bending pliers bought from ebay)
- Small needle nose pliers
- 1200 to 2000 grit aluminum oxide paper
- G96 gun treatment or a similar product
- Microfibre cloth
Fitting Guide
This can be a difficult part to replace and is best done in a modified offset vise or a custom-made jig designed to compress the Tikka striker pin assembly safely. The disassembly and reassembly under spring pressure is what makes it difficult. The following steps are how we install this kit which is also shown in the image gallery. If in doubt we recommend a gunsmith installation.
Wear safety glasses and do not stand in front of the compressed striker pin assembly at anytime.
Disassembly
- The striker pin can be compressed safely in a modified engineers offset vise (or similar). The vise will need a minimum of two small holes drilled in adjacent surfaces. The striker pin hole for assembly needs to be 5mm or 13/64″, and the cocking indicator hole needs to be 6.5mm or 17/64″ (see image gallery). The alignment of these holes needs to account for the offset of the cocking indicator to the striker pin axis (the cocking indicator orbits the striker pin). Drill the striker pin hole first then position the assembly to mark out the position for drilling the cocking indicator hole.
- Secure the striker pin assembly by inserting both ends into these holes ensuring a snug fit. Slowly close the vise jaws sufficiently to compress the striker spring so that the snap ring contained underneath the collet is exposed. We also drill a third, slightly larger striker pin hole (5.5mm) for the disassembly step which allows the snap ring to travel through the vise face but locks against the collet. This is optional but makes disassembly easier in our experience.
- The snap ring can be pried open using the tips of two small stanley screwdrivers or a similar tool and then pulled out using nylon-jawed pliers.
- Dispose of the old snap ring and slowly open the vise jaws, removing the striker pin assembly once the striker spring is fully decompressed.
Cleaning
- Thoroughly clean the striker pin and other components to be retained, remove any burrs (see steps below in ‘Maintenance’). Our collets are turned to tighter tolerances than the Tikka factory part you are replacing. At this step we clean the striker pin with 2000 wet and dry. This after removing any burrs to ensure a tight but functional fit to the collet. The striker pin can be polished beyond this if desired.
Reassembly
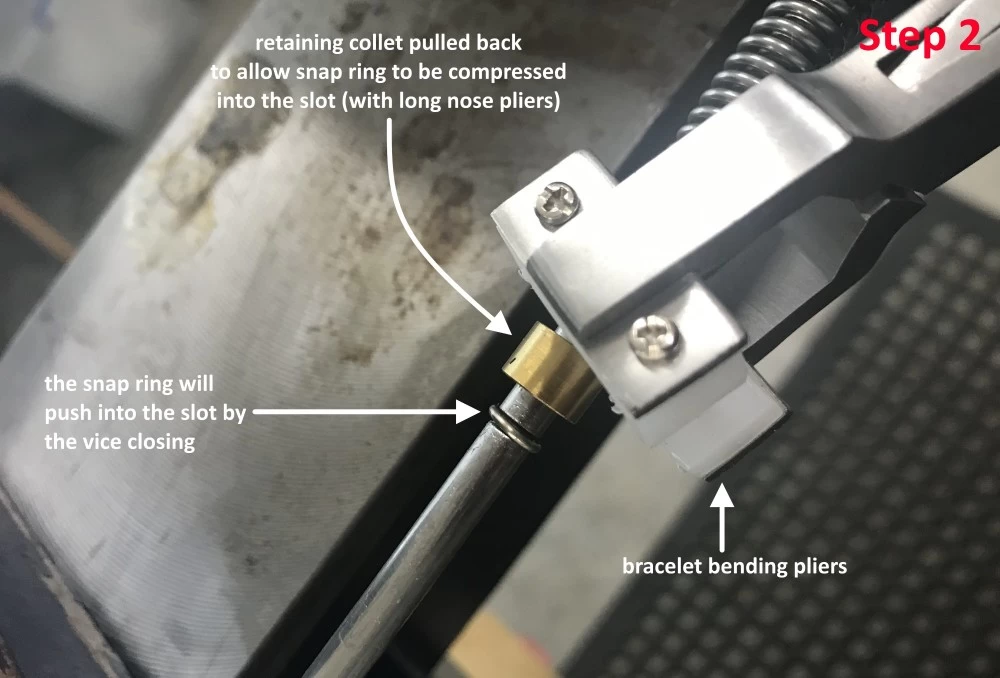
- Reassemble using our spring kit by repeating the process above. However install the snap ring in front of the collet prior to inserting it back into the vise. This to ensure the striker pin is in the 5mm sized hole. The new snap ring will expand as it is pushed over the diameter of the striker pin. Then close it again once it reaches the slot.
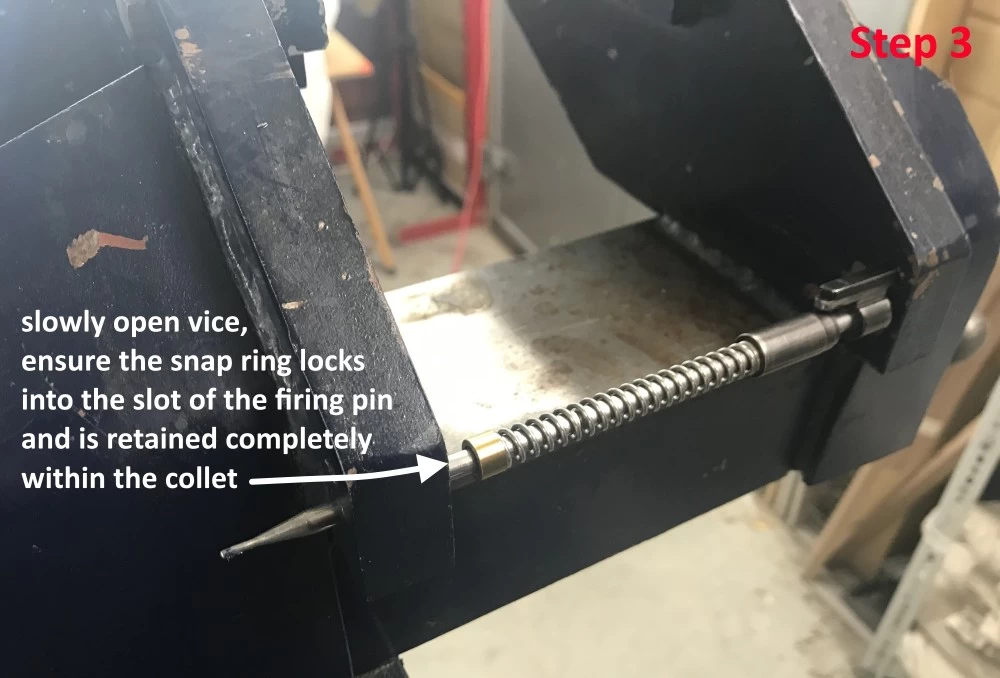
- Once the snap ring sits into the slot, use the nylon-jawed pliers to pull back the collet. Then compress the snap ring using small needle nose pliers or a similar tool so that it can then fit under the new collet. Opening the vise whilst squeezing the edge of the snap ring will see it slide under the collet. Ensure the new snap ring is completely enclosed by the new collet.
- Always check the functioning of your bolt and trigger after reassambling. Be aware of heavy bolt closures, indicating improper functioning of the rifle. With the (free) gold spring, try reducing the number of coils by cutting 1 to 4 off.
Maintenance
Clean all scale and debris off the striker pin using a suitable gun solvent. Inspect the pin surface to ensure it is burr free. Any burrs can be removed to achieve a smooth/polished surface by starting with 1200 grit wet and dry paper. Then work up to finer grits from there. Using an ultrasonic cleaner works well for really dirty striker pins.
Spray the striker pin with G96 and cleaning thoroughly using a microfibre cloth until it is touch dry, don’t apply grease anywhere. Our entire kit is made from high quality materials and is resistant to corrosion. Discoloration around the tip of the striker pin is normal and is due to the heat treatment applied during manufacture.
Additional information
| Weight | 0.02 kg |
|---|---|
| Dimensions | 10 × 1 × 1 cm |